Using Windows keystrokes on a Mac

Alas. I've been using Windows so long that now I go back to the Mac and want Ctrl-C to work. Sad, but there it is. At last I found Karabiner, which does keyboard remapping, and created a set of Karabiner rules to map the main Windows Ctrl-keystrokes to the matching ⌘-keystroke on Mac:

Karabiner Rules for main Windows Ctrl-keystrokes on MacOs

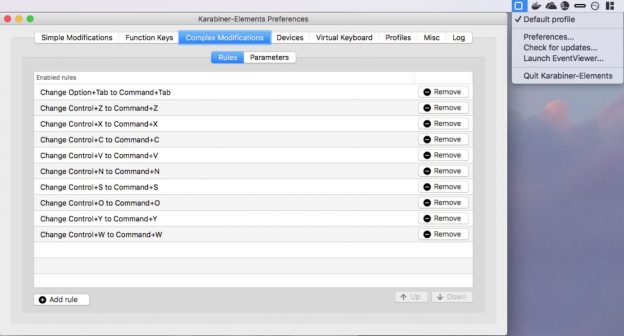
Okay, so Ctrl-W isn't strictly a windows keystroke. But who can work without Ctrl-W?

Karabiner Complex Rules Snippet

 
{
    "profiles": [
        {
            "complex_modifications": {
                "parameters": {  /* ... etc ... */ },
"README": "********************************************************************************************************",
"README": "*" COPY JUST THE ELEMENTS OF THIS "rules" array into your profiles.complex_modifications.rules array. "*",
"README": "********************************************************************************************************",
              
                "rules": [
                    {
                        "description": "Change Control+Z to Command+Z",
                        "manipulators": [ { "from": { "key_code": "z","modifiers": {"mandatory": ["control"],"optional": ["any"]}},"to": [{"key_code": "z","modifiers": ["command"]}],"type": "basic"}]
                    },
                    {
                        "description": "Change Control+X to Command+X",
                        "manipulators": [ { "from": { "key_code": "x","modifiers": {"mandatory": ["control"],"optional": ["any"]}},"to": [{"key_code": "x","modifiers": ["command"]}],"type": "basic"}]
                    },
                    {
                        "description": "Change Control+C to Command+C",
                        "manipulators": [ { "from": { "key_code": "c","modifiers": {"mandatory": ["control"],"optional": ["any"]}},"to": [{"key_code": "c","modifiers": ["command"]}],"type": "basic"}]
                    },
                    {
                        "description": "Change Control+V to Command+V",
                        "manipulators": [ { "from": { "key_code": "v","modifiers": {"mandatory": ["control"],"optional": ["any"]}},"to": [{"key_code": "v","modifiers": ["command"]}],"type": "basic"}]
                    },
                    {
                        "description": "Change Control+N to Command+N",
                        "manipulators": [ { "from": { "key_code": "n","modifiers": {"mandatory": ["control"],"optional": ["any"]}},"to": [{"key_code": "n","modifiers": ["command"]}],"type": "basic"}]
                    },
                    {
                        "description": "Change Control+S to Command+S",
                        "manipulators": [ { "from": { "key_code": "s","modifiers": {"mandatory": ["control"],"optional": ["any"]}},"to": [{"key_code": "s","modifiers": ["command"]}],"type": "basic"}]
                    },
                    {
                        "description": "Change Control+O to Command+O",
                        "manipulators": [ { "from": { "key_code": "o","modifiers": {"mandatory": ["control"],"optional": ["any"]}},"to": [{"key_code": "o","modifiers": ["command"]}],"type": "basic"}]
                    },
                    {
                        "description": "Change Control+Y to Command+Y",
                        "manipulators": [ { "from": { "key_code": "y","modifiers": {"mandatory": ["control"],"optional": ["any"]}},"to": [{"key_code": "y","modifiers": ["command"]}],"type": "basic"}]
                    },
                    {
                        "description": "Change Control+W to Command+W",
                        "manipulators": [ { "from": { "key_code": "w","modifiers": {"mandatory": ["control"],"optional": ["any"]}},"to": [{"key_code": "w","modifiers": ["command"]}],"type": "basic"}]
                    }
                ],
"README": "******************************************************************************************************",
            /* ... etc ... */
            }
        }
    ]
}

Editing the Keyboard Map

This approach didn't work for me. I'm not sure what I missed.

‘bash\r’: No such file or directory. Or, editing unix files on a Windows machine

'bash\r': No such file or directory

What does that mean, you ask yourself? It usually means you are editing *nix script files on a windows system, and then running the files on a *nix machine. For instance in docker, or a VM.

Your GUI solution is to use a text editor that allows you to save with unix line endings. `Notepad++` calls it, very reasonably, `'EOL conversion'`. Sublime text calls it `View->Line Endings`.

Your commandline solution in a bash shell on macos is sed -i.bak $'s/\r//' * and on linux the same but you don't need the ansi-C quoting: sed -i.bak 's/\r//' *
A further complication if you are using git is that it keeps getting reset back to windows. You could fix this with `git config core.autocrlf false` but that may have other consequences which you don't want to bother with.

Use a public docker image in AWS ECS

Amazon Web Services carefully explain how to use a private docker image in ECS, the Amazon container service. But fails to mention what repository URL to use for a dockerhub public repository. The answer is … none at all. Just the same as the docker CLI, if you specify just namespace/imagename for a container image, ECS will pull it from dockerhub.

Postgres : Using Integrated Security or ‘passwordless’ login on Windows on localhost or AD Domains

…is slightly less straightforward than you might hope, but helpfully more flexible. For MS SQL Server, integrated security implies that windows user are magically also SQL users and that no password or username is needed to login. But also, that you can no longer choose which user you login as. Postgres is more configurable and more complex. You can specify which users use SSPI and which postgres user(s) each windows user can login as. You can specify, for instance, that you are allowed to use SSPI to login as the postgres superuser.

Here is how you can login with integrated security, as the user postgres, whilst still being able to login as a different user with a password.

  1. Locate and open for editing two files: your pg_hba.conf and pg_ident.conf files. Find them both in the same directory in e.g.
    C:\Program Files\PostgreSQL\data\pg96 or
    C:\Program Files\PostgreSQL\10\data\
  2. In pg_ident.conf add a line to map your windows login, in user@machinename format, to the postgres user named postgres. You can also add other users. Here's what my lines look like:
    # MAPNAME       SYSTEM-USERNAME         PG-USERNAME
    MapForSSPI     chris@YOURMACHINENAMEHERE    chris
    MapForSSPI     chris@YOURMACHINENAMEHERE    postgres

    (In normal unix style, the columns are separated by any amount of space or tab).

  3. In pg_hba.conf, add lines that allow user postgres to login with integrated security, whilst still allowing all other users to login with passwords. Again, you can add lines for other users too. Don't forget to put lines targetting specific users above the catchall lines otherwise they will never be reached.
    # TYPE  DATABASE        USER            ADDRESS                 METHOD
    
    #== lines for specific users for SSPI (or anything else) BEFORE the catchall lines ==
    # IPv4 local connections for SSPI:
    host    all             postgres        127.0.0.1/32            sspi 	map=MapForSSPI
    host    all             chris           127.0.0.1/32            sspi 	map=MapForSSPI
    # IPv6 local connections for SSPI:
    host    all             postgres        ::1/128                 sspi 	map=MapForSSPI
    host    all             chris           ::1/128                 sspi 	map=MapForSSPI
    #===================================================================================
    
    # IPv4 local connections:
    host    all             all             127.0.0.1/32            scram-sha-256
    # IPv6 local connections:
    host    all             all             ::1/128                 scram-sha-256
    
  4. Restart the Postgres service, for instance with a powershell command
    Restart-Service 'PostgreSQL 9.6 Server'
  5. Trying logging in as user postgres:
    • psql -h localhost -U postgres
  6. Trying logging in as some other user:
    • psql -h localhost -U someotherusercreatedwithcreaterole
      and you should be prompted for a password (unless you already mastered the pgpass.conf file)

Logging in without specifying a user name

You might expect that SSPI implies not having to specify a username. You would be wrong. Postgres still requires you specify a username when using SSPI, and, as above, allows you to choose which username.

You can however login without a username—with or without SSPI—if there is a postgres user (i.e., a role with LOGIN privilege) with your Windows username (just the name, without the @machinename).

By combining this with the SSPI map above you can then login without typing username or password.

Integrated Security in .Net connection strings

Having done the above I can now use either of

"Host=localhost;Database=MyDb;Integrated Security=True;Username=postgres"
"Host=localhost;Database=MyDb;Integrated Security=True;Username=chris"

as a connection string for the npgsql Ado.Net driver

Reference

https://www.postgresql.org/docs/9.4/static/auth-pg-hba-conf.html and subsequent pages on Authentication methods and the pg_ident.conf file.

Caveats

Why does the title of this post say 'localhost or AD domains'? Because SSPI only works on Windows; and only on either localhost, or a Windows Domain environment as per https://wiki.postgresql.org/wiki/Configuring_for_single_sign-on_using_SSPI_on_Windows

Which brings us to the alternative that does work remotely without Domain servers: putting passwords in the pgpass.conf file.

Postgres ‘Passwordless’ Login

Storing passwords in plaintext on a windows machine is largely a no-no in most peoples eyes. Unixland is more accepting of it, perhaps because they habitually expect file permissions  to deny access to unauthorised users. And don't expect to have virusses scanning their machines.

psql.exe on Windows will look for a %appdata%\PostGres\pgpass.conf file (or $env:AppData\PostGres\pgpass.conf for PowerShellers) and will parse lines in this format:

hostname:port:database:username:password

See https://www.postgresql.org/docs/9.1/static/libpq-pgpass.html for some wildcard options such as

localhost:*:*:chris:mydevpassword

Your plaintext password is then protected by Windows file permissions. Which should be fine for passwords to non-production servers.