NUnit Constraints Example – a Simple Custom Constraint

Are you short of an NUnit Assertion? You have some code for a test, but you really want it in NUnit constraint form so you can use it like any other test. They are easy to write. Here's an example which wraps a function you already wrote as a Constraint:

public class EqualsByValueConstraint : Constraint
{
	private readonly object expected;
	private CompareResult compareResult;

	public EqualsByValueConstraint(object expected)
	{
		this.expected = expected;
	}

	public override bool Matches(object actual)
	{
		this.actual = actual;
		compareResult = EqualsByValueOrFailureReason(actual, expected);
		return compareResult;
	}

	public override void WriteDescriptionTo(MessageWriter writer)
	{
		writer.WriteExpectedValue(this.expected);
	}
	public override void WriteActualValueTo(MessageWriter writer)
	{
		base.WriteActualValueTo(writer);
		writer.WriteLine();
		writer.WriteMessageLine("Compare Result " + compareResult);
	}
}
public class CompareResult
{
	public bool IsPass {get;set;}
	public string FailureDescription {get; set;}
}

If your function is just a boolean, then you could remove the CompareResult class. The drawback being that your failure message will only say 'failed' rather than give an explanation of the failure. In that case, you might just as well not use the constraint and use the Assert.That(bool, message) overload.

dotCover config file for command line NUnit test coverage

So you want to produce a coverage report for your .Net project, preferably from the command line? If you use dotCover and NUnit then this:

<?xml version="1.0" encoding="utf-8"?>
<AnalyseParams>
    <Executable><!-- Path to your NUnit bin directory e.g.  -->C:\Program Files\NUnit 2.5.10\bin\net-2.0\nunit-console.exe</Executable>
    <WorkingDir><!-- This path works for running dotCover with a config file in the project directory-->bin\Debug\</WorkingDir>
    <Arguments><!-- The dlls containing NUnit tests. Space delimited if more than one-->My.Tests.dll My.MoreTests.dll</Arguments>
    <Output><!-- Path to where I want the report. Can be relative or absolute -->My.Tests.Coverage.html</Output>
    <Filters>
        <IncludeFilters>
            <FilterEntry><!--  _ "Module" means project _ --><ModuleMask>*</ModuleMask></FilterEntry>
        </IncludeFilters>
        <ExcludeFilters>
            <FilterEntry><!--  _ "Module" means project _ --><ModuleMask>My.Tests</ModuleMask></FilterEntry>
            <FilterEntry><!-- namespaces can be filter with a ClassMask with * wildcard --><ClassMask>Namespaces.For.AutogeneratedCode.*</ClassMask></FilterEntry>
            <FilterEntry><ClassMask>SomeUntestable.Class</ClassMask></FilterEntry>
        </ExcludeFilters>
    </Filters>
    <ReportType>html</ReportType>
 </AnalyseParams>

will allow you, from the command line, to type:

dotCover analyse MyConfigFileName.xml

and generate coverage reports. Assuming that dotCover is in your path of course.
I like to set the filters to exclude coverge report on the test project itself as well as autogenerated code.

Covering Multiple Test Projects In One Run

  • Set your working directory to be a parent of all the test projects, e.g. the solution directory.
  • List the full relative paths to each Test dll, space limited:
    <WorkingDir>.</WorkingDir>
    <Arguments>Web.Tests\bin\Debug\MyProject.Web.Tests.dll Implementation.Tests\bin\Debug\MyProject.Implementation.Tests.dll</Arguments>

Filtering and more advanced coverage configs

  • Look down the right hand side of the page here : http://www.jetbrains.com/dotcover/documentation/index.html for documentation, such as it is.
  • Filtering is covered here: http://blogs.jetbrains.com/dotnet/2010/07/filtering-with-dotcover/
  • More complex stuff is touched on here: http://blogs.jetbrains.com/dotnet/tag/code-coverage/

Visual Studio creates unwanted directories for a new solution

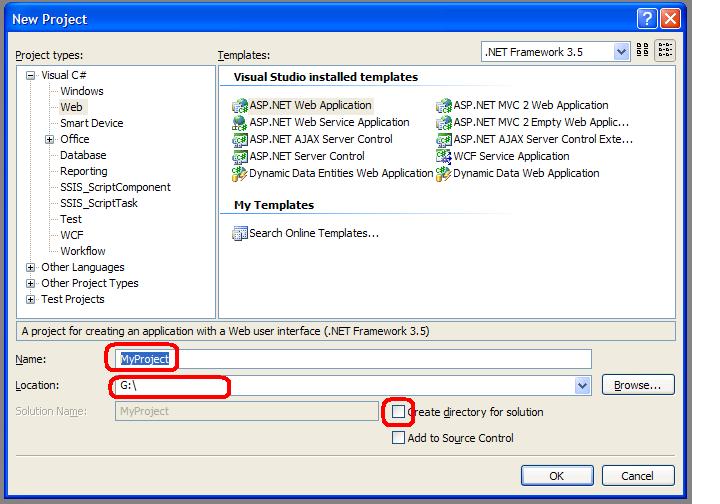
So, all you want is to create a new visual studio project called MyProject in a SINGLE directory called MyProject. But behold, Visual Studio has created a million levels of directories called \MyProject\MyProject\MyProject for your project. And put it all all in source control to boot.
Simples:

  1. Specify your project name
  2. Specify the parent directory for MyProject
  3. Untick 'Create Solution Directory

Visual Studio Create Project dialog highlighting the input fields for project name, existing parent directory and the unticked Create Solution Directory option
Visual Studio Create Project dialog

Voila.

Get the Moq Mock from a mock object

Update: See Vladimir's comment below for the built in one-liner.

So there you in your code or possible your debugger and immediate window and you have a mock object and realise you want to change the setup but you didn't keep a reference to the Mock<> ...
So your first though is, no problem, you can cast your object to one of type Castle.Proxies.MyStronglyTypedProxyClass and voila you have access to the Mock property. Except that the compiler doesn't recognise Castle.Proxies.MyStronglyTypedProxyClass as real class.
So then you try reflection to get hold of the Mock property. Which nearly works, but you get a System.Reflection.AmbiguousMatchException : Ambiguous match found. because there's more than one property called Mock (one with and one without a generic parameter).
But this worked for me:

public static Mock<T> GetMockFromObject<T>(T mockedObject) where T : class
{
    PropertyInfo[] pis = mockedObject.GetType().GetProperties()
        .Where(
            p => p.PropertyType.Name == "Mock`1"
        ).ToArray();
    return pis.First().GetGetMethod().Invoke(mockedObject, null) as Mock<T>;
}

hope that helps.