MacBook Pro 2011 17″ Disable Broken Radeon Graphics Card and Force use Integrated Graphics

If you own one of the last generation of 17" MacBook Pros from 2011, and if you have worked with a large external monitor, you may reach the point of frying the Radeon graphics card.

Since the model also has built-in Intel graphics, the question arises, can I not carry on working with that?

Yes you can.

This script helps you to disable the card at boot, and force use of the Intel integrated graphics. And, to re-run that process after an O/S update has undone the changes. The loss is that you can no longer plug an external monitor in. The gain is that your MacBook 17" now works again, and runs slightly cooler/at lower power to boot.

Several steps are involved. I wrote a script to reduce the steps to:

1. Boot to recovery mode and run the script
2. Boot to single user mode and run the script
3. Optionally boot to recover mode again to re-able SIP.

Recall that to run the script you must make it executable: chmod a+x force-integrated-graphics.sh

But how do I use this if I've already broken the graphics card?

* You should still be able to use the Cmd-S, or Cmd-RS keypresses at boot to get to a command line. If you can get from there to a pendrive or a network drive, then you can copy the script.

https://gist.github.com/chrisfcarroll/ff8ad18be53b0391464a9affeb119364

#! /bin/sh

kextoffdir="/kextoff"
loginhookscript="/Library/LoginHook/LoadDelayedAMDRadeonX3000kext.sh"

echo "---------------------------------------------------------------
Run this script twice.
First, from a Recovery Mode commandline to run csrutil disable.
Second, after rebooting to a Single user mode commandline, with / partition mounted writeable, to do all the things that must be done with csrutil status= disabled

After that, rerun Recovery mode to run \`csrutil enable\` again.

* How to start in Recovery mode? Cmd-R

* How to start in Single user mode? Cmd-S

---------------------------------------------------------------
"

echo "
nb: csrutil disable only works in recovery mode
"
csrutil disable
echo "
csrstatus:
"
csrutil status

echo "
Moving the AMDRadeonX3000.kext out of extensions and updating the extensions cache
"
mount -uw /
mkdir -p $kextoffdir
mv /System/Library/Extensions/AMDRadeonX3000.kext/ $kextoffdir/
touch /System/Library/Extensions/

echo "
Set nvram magic things. This is the step that disables the Radeon as the bootup graphics card
"
nvram 'fa4ce28d-b62f-4c99-9cc3-6815686e30f9:gpu-power-prefs=%01%00%00%00'
nvram boot-args="-v"
nvram fa4ce28d-b62f-4c99-9cc3-6815686e30f9:gpu-power-prefs
nvram -p

echo "
Add a loginHook to load AMDRadeonX3000.kext after boot
"
mkdir -p /Library/LoginHook

cat > /Library/LoginHook/LoadDelayedAMDRadeonX3000kext.sh <

Kudos and References

* https://apple.stackexchange.com/questions/166876/macbook-pro-how-to-disable-discrete-gpu-permanently-from-efi
* https://github.com/codykrieger/gfxCardStatus

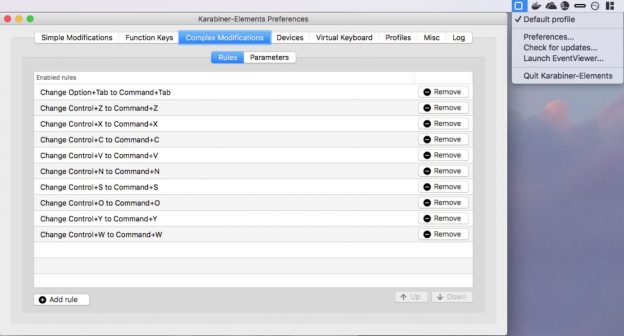
Using Windows keystrokes on a Mac

Alas. I've been using Windows so long that now I go back to the Mac and want Ctrl-C to work. Sad, but there it is. At last I found Karabiner, which does keyboard remapping, and created a set of Karabiner rules to map the main Windows Ctrl-keystrokes to the matching ⌘-keystroke on Mac:

Karabiner Rules for main Windows Ctrl-keystrokes on MacOs

Okay, so Ctrl-W isn't strictly a windows keystroke. But who can work without Ctrl-W?

Karabiner Complex Rules Snippet

 
{
    "profiles": [
        {
            "complex_modifications": {
                "parameters": {  /* ... etc ... */ },
"README": "********************************************************************************************************",
"README": "*" COPY JUST THE ELEMENTS OF THIS "rules" array into your profiles.complex_modifications.rules array. "*",
"README": "********************************************************************************************************",
              
                "rules": [
                    {
                        "description": "Change Control+Z to Command+Z",
                        "manipulators": [ { "from": { "key_code": "z","modifiers": {"mandatory": ["control"],"optional": ["any"]}},"to": [{"key_code": "z","modifiers": ["command"]}],"type": "basic"}]
                    },
                    {
                        "description": "Change Control+X to Command+X",
                        "manipulators": [ { "from": { "key_code": "x","modifiers": {"mandatory": ["control"],"optional": ["any"]}},"to": [{"key_code": "x","modifiers": ["command"]}],"type": "basic"}]
                    },
                    {
                        "description": "Change Control+C to Command+C",
                        "manipulators": [ { "from": { "key_code": "c","modifiers": {"mandatory": ["control"],"optional": ["any"]}},"to": [{"key_code": "c","modifiers": ["command"]}],"type": "basic"}]
                    },
                    {
                        "description": "Change Control+V to Command+V",
                        "manipulators": [ { "from": { "key_code": "v","modifiers": {"mandatory": ["control"],"optional": ["any"]}},"to": [{"key_code": "v","modifiers": ["command"]}],"type": "basic"}]
                    },
                    {
                        "description": "Change Control+N to Command+N",
                        "manipulators": [ { "from": { "key_code": "n","modifiers": {"mandatory": ["control"],"optional": ["any"]}},"to": [{"key_code": "n","modifiers": ["command"]}],"type": "basic"}]
                    },
                    {
                        "description": "Change Control+S to Command+S",
                        "manipulators": [ { "from": { "key_code": "s","modifiers": {"mandatory": ["control"],"optional": ["any"]}},"to": [{"key_code": "s","modifiers": ["command"]}],"type": "basic"}]
                    },
                    {
                        "description": "Change Control+O to Command+O",
                        "manipulators": [ { "from": { "key_code": "o","modifiers": {"mandatory": ["control"],"optional": ["any"]}},"to": [{"key_code": "o","modifiers": ["command"]}],"type": "basic"}]
                    },
                    {
                        "description": "Change Control+Y to Command+Y",
                        "manipulators": [ { "from": { "key_code": "y","modifiers": {"mandatory": ["control"],"optional": ["any"]}},"to": [{"key_code": "y","modifiers": ["command"]}],"type": "basic"}]
                    },
                    {
                        "description": "Change Control+W to Command+W",
                        "manipulators": [ { "from": { "key_code": "w","modifiers": {"mandatory": ["control"],"optional": ["any"]}},"to": [{"key_code": "w","modifiers": ["command"]}],"type": "basic"}]
                    }
                ],
"README": "******************************************************************************************************",
            /* ... etc ... */
            }
        }
    ]
}

Editing the Keyboard Map

This approach didn't work for me. I'm not sure what I missed.

‘bash\r’: No such file or directory. Or, editing unix files on a Windows machine

'bash\r': No such file or directory

What does that mean, you ask yourself? It usually means you are editing *nix script files on a windows system, and then running the files on a *nix machine. For instance in docker, or a VM.

Your GUI solution is to use a text editor that allows you to save with unix line endings. `Notepad++` calls it, very reasonably, `'EOL conversion'`. Sublime text calls it `View->Line Endings`.

Your commandline solution in a bash shell on macos is sed -i.bak $'s/\r//' * and on linux the same but you don't need the ansi-C quoting: sed -i.bak 's/\r//' *
A further complication if you are using git is that it keeps getting reset back to windows. You could fix this with `git config core.autocrlf false` but that may have other consequences which you don't want to bother with.

MacBook Pro clamshell mode with the lid open

Or rather: how can I disable the built-in display and carry on working on an external monitor without having the laptop overheat and whine like an aeroplane because the lid is down?

OS X users have spilt a lot of pixels on this and I too was frustrated because my shiny new 34" screen made the laptop screen redundant; but keeping the lid shut often made the fan turn on.

SwitchResX came to my rescue, not for the first time. It has a daemon option with a menubar icon for turning displays on/off & for switching the resolution.

I got SwitchResX originally because my monitor does picture-by-picture display of 2 computers plugged in to it at once; which is only truly cool if said computers have a screen resolution option for half-a-screen. Which SwitchResX solves by allowing custom resolutions. So I've become a fan: it works simply and reliably and solves my problems.

I only recently came across this dance http://osxdaily.com/2012/06/15/yet-another-way-to-turn-off-internal-lcd-display-of-macbook-pro-with-lid-open/ which I haven't yet tried. I know other attempts to 'trick' the screen off failed after Mavericks