Apple UK Keyboard Layout for Windows

You want your Apple keyboard to work for windows? Behold the Apple UK Keyboard Layout for Windows Installer.

When I wrote it I was using one of these:
Apple Pro Keyboard
… but the Apple layout hasn't changed, so this layout works for current Apple keyboards.

Some third party keyboards have one less key: the ± § key is missing and the ` ~ key takes its place. For that I use autohotkey — see below.

The 2020 Windows 10 update required me to reinstall the keyboard layout — it appeared in the language settings keyboard list but not in the taskbar list of available keyboards. Reinstall-repair fixed it.

⌥⌥⌥⌥⌥⌥ ⌘ ⌥⌥⌥⌥⌥⌥

Swapping between Mac and Windows

A further problem for constant Mac-PC swappers is repeated Cmd and Ctrl shortcut confusion: You want to type Cmd-X for cut and suddenly the Win-X menu comes up instead.

My preferred solution for this is an AutoHotkey script, partly because after using Autohotkey for a few weeks I realised it is utterly brilliant, an all-singing, all-dancing customise-your-Windows-in-every-way tool, with an all-but-zero footprint.
My script is https://gist.github.com/chrisfcarroll/dddf32fea1f29e75f564, which also has shortcut keys for arranging windows on a big screen.

The other reason I use autohotkey is that it enables a cherry-picking approach to swapping or duplicating Cmd-key/Ctrl-key shortcuts, which I find works much much better than doing a straight Cmd<=>Ctrl key swap. I got this approach from the keyboard layout used by Parallels on the Mac, which simply duplicated common shortcuts such as Ctrl-X, Ctrl-V to the Cmd-key. If you swap regularly between Mac & PC, this approach works well.

Inverting Mouse Scroll Direction

Since about the time that iPhone launched, OS X scroll direction, both mouse and keyboard, has used the metaphor of "push the document up to move it up the window" rather than the previous "push the scroll bar up to move the document down the window." Windows has stayed firmly on the scrollbar metaphor.
Oddly enough, Microsoft mice come with a Windows driver that let you reverse scroll direction via the UI. For other mice, you can FlipFlopScrollWheel. Oddly, this is not per-user but per mouse/usb port combination, which means if you plug the same mouse into a different port it scrolls in the opposite direction. It also means that having run the script, you must unplug the mouse, wait a second, and plug it back in again.

Back to the Keyboard

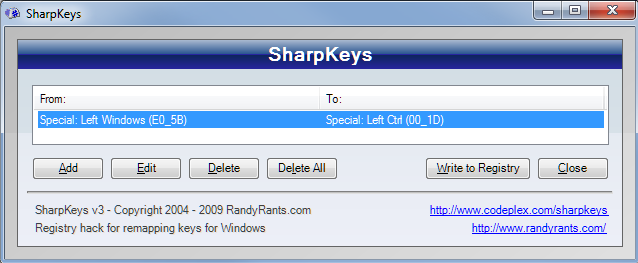
If you do want a complete Cmd<=>Ctrl key swap, then you do it with Randy's SharpKeys.

Warning! You can't swap keys around with it so do just this: map Left-Windows key to Left-Control. The right windows key will then still open the Windows menu and do all the Windows-Key stuff that it should do, such as Windows-L for Lock screen/Switch User:

Sharp Keys: Map just the left Windows key to Control key

If you want other keyboards than Apple UK, download the Microsoft Keyboard Layout Creator to tweak your layout.

Use a Windows NTFS, or Linux, or Network, or other–formatted disk for Apple Time Machine Backups

It used to be well known that you have to use an Apple formatted disk (HFS+) for Time Machine Backups and you can't use an NTFS formatted disk, or any of the popular *nix disk formats with Time Machine.

Except, you always could.

Gotchas And Caveats

It's not always a first choice option:

  • If your Windows drive is connected over USB2, it will be much slower than a Mac disk connected over Thunderbolt or USB 3 or 4. My first backup of 120GB took about 10 hours, aka all night. But further backups after that first one are much quicker.
  • On an external drive plugged in to your computer, the backup volume may not auto-mount when you plug the drive in. You must manually double-click the <YourMachineName>.sparsebundle in the Finder each time you plug the drive in. After that, Time Machine backups will run as normal.
  • Backups, especially to a network share, are best done with some extra setup to improve reliably unless your network, server, router, disks and desktop all stay reliably connected and switched on.

Backing up to a plugged-in NTFS drive

  1. Plug in your foreign-formatted disk and get a read/write driver for it.

  2. Save the the script from tmMakeImage script in, for instance, your Downloads directory.

  3. Open a terminal window.

  4. If you saved to Downloads, then something like this should make the script executable and show you command line usage:

    cd ~/Downloads
    chmod a+x tmMakeImage
    mv tmMakeImage /usr/local/bin
    tmMakeImage
  5. So if your external drive has a Volume called WinDrive, and your Mac drive is about 250GB then this command should initialise it for Time Machine backups:

    tmMakeImage 500GB /Volumes/WinDrive GO
  6. Optionally, follow up with an immediate tmutil startbackup

Opening the Time Machine preferences should now show that you have "Time Machine Backups" selected as your backup drive. Don't forget to double-click the sparsebundle each time you attach the drive, to mount your Backup Volume and allow Time Machine to do its stuff.

Network Drives

Backup to a network drive in a similar way. First mount your smb network fileshare in the Finder, then use the tmMakeImage script to put the sparsebundle image on the mounted drive.

Reliability

Reliability is a concern for backing up across a network, or to a removeable in disk. In otherwise, it's always a concern. Especially if you have a laptop which gets plugged in and out. See notes on using time machine backup to a windows share more reliably.

Background: Using Sparsebundles to create HFS+ formatted drive on a 'foreign' disk format

Apple created, it seems, sparse images and sparse bundles to solve the problem of saving backups on a network drive. Time Machine uses and recognises them. It might even auto-mount the sparsebundle disk image when you re-attach the drive in order to start running a backup.

Other Things Under the Hood of Time Machine Disks

  • You can't create a sparsebundle directly on a network or 'foreign' drive. So the tmMakeImage script first creates the sparsebundle image then copies it to its destination.
  • Sparsebundles don't use up empty space. An sparsebundle declared as 500GB but still empty will only take up a few megabytes of real disk space.
  • A sparsebundle used by Time Machine has a com.apple.TimeMachine.MachineID.plist file in the package, which contains the UUID of the physical machine it belongs to. This stops you accidentally using backups on the 'wrong' machine. (Time Machine does let you browse and use 'wrong' backups though).
  • An external disk plugged in to your Mac must have "Ignore ownership permissions" Off, whereas by default the Mac mounts external drives with "Ignore ownership permissions" set to On. This setting is not stored on the drive itself; it's stored on your machine and can be specified each time the drive is mounted (man hdiutil) or specified permanently (man vsdbutil)
  • You can set the Time Machine destination to a sparsebundle on an attached drive by first mounting it then doing tmutil setdestination /Volumes/Volumenameonceitsbeenmounted. You can mount the image either by double-clicking it in Finder, or with hdiutil attach /path/to/image.
  • Learn More:

    ```
    man tmutil
    man hdiutil
    man vsdbutil
    ```

  • You can still use your backup disks for other files alongside your Time Machine backups. Just don't touch the Backups.backupdb folder! The Finder will protect it to some extent; it doesn't let you modify things in there, but it will let you delete and add things.
  • The Script

    Most of the things in the tmMakeImage script can be found on the net going back to 2007, but you'll still find answers on the internet saying it can't be done.

Mac OS X Command Line: Start a process and pick it up later

I can't believe I've only just discovered the gnu screen command. You want to kick off a long running command line process and come back to it later? Like so:

  • Open a Terminal window
  • Type screen
  • Type ls -R /
  • Quit Terminal, and hum to yourself for a few seconds
  • Open a new Terminal window and type screen -R

Now that's what I call magic.

It survives logouts and is of course an essential for working with remote or cloud machines over ssh; when your network connection fails you can log back in and carry on. man screen will tell you more, although so will https://www.bing.com/search?q=linux+screen